Using Flash - Lesson 1
Flash is part of the Macromdeia Suite of programs that has now been taken over by Adobe. It works well with graphics that you have created in Fireworks but also allows you to use graphics from other packages. You can also create graphics within Flash itself.
It allows you to display a series of graphics within a timeframe. You can therefore sync the graphics to an audio track.
Flash produces a 'swf' file
(an acronym for "Small Web Format") that is playable on the web.
SWF files can contain animations of varying degrees of interactivity and function. When you load Flash the first time, it will look quite complicated - but you will soon get used to it. Lets look at the header bar first.

Click on 'File' - this allows you to open, create and save files - it also gives you the option of publishing them - outputting them in the form of a SWF or movie file. Select 'new' and create a new flash document.
The header will now expand to:

and following will appear below it:
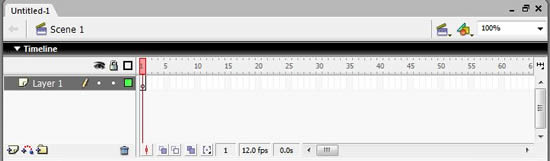
You are going to build up your vidclip in a series of layers against a timeline... but first we have to set the stage.
Click on 'Modify' and the floowing will open:

You can use this to decide on the size of your vid-clip canvas, the background colour you will use and the 'frame rate' - that is how many frames (still graphics) will be seen in one second of real time. The default setting is 12 fps (12 frames per second).
We are going to make a small vidclip so that you get the idea of what is involved. To make this easier we are going to have 2fps. You can choose the background colour you wish to use - but I suggest you leave the screen as small for this exercise.
| Record yourself saying a short nursery rhyme. |
You can use whatever sound recording accessories and programs you usually use.
Make sure that you record it clearly - speak through a filter to stop hissing and popping occurring when you say 's' or 'p' - sounds should be recorded in MP3 or WAV format. |
| Rename 'Layer1' as 'audio' and upload the soundclip into the flash library. |
You can do this by selecting 'Import (to library)' from the 'File' dropdown menu. |
| You cannot yet see what you have in the library. Click on 'window' in the header bar and select 'library' - a tick will show that you have done that - the library will then appear in the right hand info-bar. |
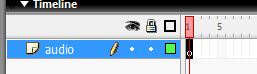
| Now click on the cell on your timeline for the audio layer of you flash document. It will go black and the cell above it will go pink - see illustration on the right. |
|
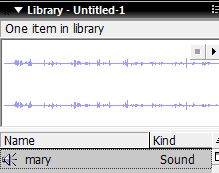 |
Find your audio file in the library and drag it onto the stage.
You will not see anything at first as your timeline only shows what is happening in the first second of the clip.
Put your cursor at about 60 frames and right click. Insert a fame at that point and the timetime will open up to show what is happening for the first minute. |
|
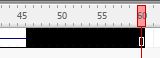 |
My audio file only lasts 45 frames. I therefore need to delete unwanted frames. I have to highlight them (left click, hold down and drag across the range so they come up in black). Then right click on the black area and select 'cut frames'. |
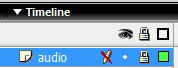 |
You should now have a completed audio layer. You can test that it works by selecting the first fram of the layer, selecting 'control' from the header bar and selecting play. When you are satisfied with it you need to lock that layer by clicking on the spot below the padlock symbol - a padlock will appear and that layer is then safe. |
SAVE! Now you must save the flash document. I suggest that you save it as Rhyme1 in a special folder within your DIDA area called Flash documents. I am a great believer in saving each stage with a different file name - Rhyme1,Rhyme2,Rhyme3 etc. This makes it easier to go back to a previous stage if you have a problem. It will save as a .FLA file. This file can be opened with Flash at a later date.
Now that you have the sound file in place you have to put together the graphics to go with it. |
Background - This will be static throughout the vidclip. On Cyberphysics I have the logo and PAWS Inc permission for using Garfield. You must have your name and form and a school logo in place for this exercise (click for the link to the graphic for saving on your desktop).
Go to the top menu bar and choose 'insert'. Insert a new layer - rename it 'background'. Now go to 'file' on the top menu bar. Choose import - and import the school logo to the library. Drag it onto the canvas and put it in the top right hand corner. It is too large - it will interfere with your vidclip. Choose modify and then 'transform' from the drop down menu. You want to change its 'scale' - select that and make the image smaller. Put it in position and make sure you are happy with it.
|
 The 'A' is the text tool - see the property bar below for your choice of font - size and colour. The 'A' is the text tool - see the property bar below for your choice of font - size and colour.
Remember that simple fonts are the best - people need to be able to read what you have put on your vidclip - think carefully about size, colour and font. |
Now add your name. It needs to be legible but not overpowering. I want you to put it in the bottom right hand corner. To move it about you need to use the left arrow from the Tools tray.
Once you are happy with the background, lock that layer - test and save and then move on to the next stage.
|

|
We are now going to do the 'lyrics' section. Create a layer called 'lyrics' and type in the first line of your rhyme. This needs to be easily visible - it should be a much bigger font than that you chose for your name and positioned at the bottom of the screen. It is better to have the text left alighned than to have it centred in my opinion - but that is up to you!.
This part of the exercise should make you understand why audio clips are best in small chunks. They can be recorded as a large section and then broken into parts - but small is best when it comes to synchronising images with the sound! You need to take the cursor back to the start of an audio clip in order to play it - and you need to play it in order to synchronise words and images. In this exercise you will have to go back to the beginning each time to find the location of the start of each line of the rhyme.
So, to add line 2 in the correct place you need to listen to the recording an then press escape when you hear the end of the frist line. You then have a position on the timeline for the next line of the rhyme - right-click on that frame and choose 'convert to Keyframes' from the menu. (You could make it a blank keyframe but that would mean setting up the font and position for text all over again - this way you just amend the text to read the next line). You repeat this process until you have completed the lyrics.
This sychronising of the text with the sound is the most tedious part of the operation - but it is important to get it right. One that is in place the addition of the graphics is easy.
|
| Rules for graphics |
- Carefully note down where you had them from. If possible make sure they are primary source material - make use of that camera!
- It is a good idea to search images on the web - it may give you ideas for the composition of the graphic image.
- Remember that it takes a long time to draw your own graphics!
|
The first step is to find graphics that illustrate your vid-clip. Then you need to import them to the library and finally you need to create a graphics layer and to insert images at the appropriate point in your vid-clip - to do that you need to have keyframes at appropriate points - as with the lyrics.
Videos automatically repeat unless you tell the computer to stop at the end. To make it stop you need to include instructions called 'action script'. I usually have a new layer for my actionscript. Add a layer and name it. Now insert a blank keyframe at the end of your movie within that layer. Open the 'Actions - Frame' at the bottom of your screen and type in:
stop();
You have to be very careful to type it exactly as written - if the syntax is wrong the computer will not understand the command.
Now select 'Commands' from the top bar menu and test your move. When you are happy with it you will need to export it. Select the File option from the top menu bar and select 'Export' - 'Export Movie'. A dialogue box will open and you will be able to name your movie as a 'swf' file and save it.
Here is my vidclip - I look forward to seeing yours!
|


